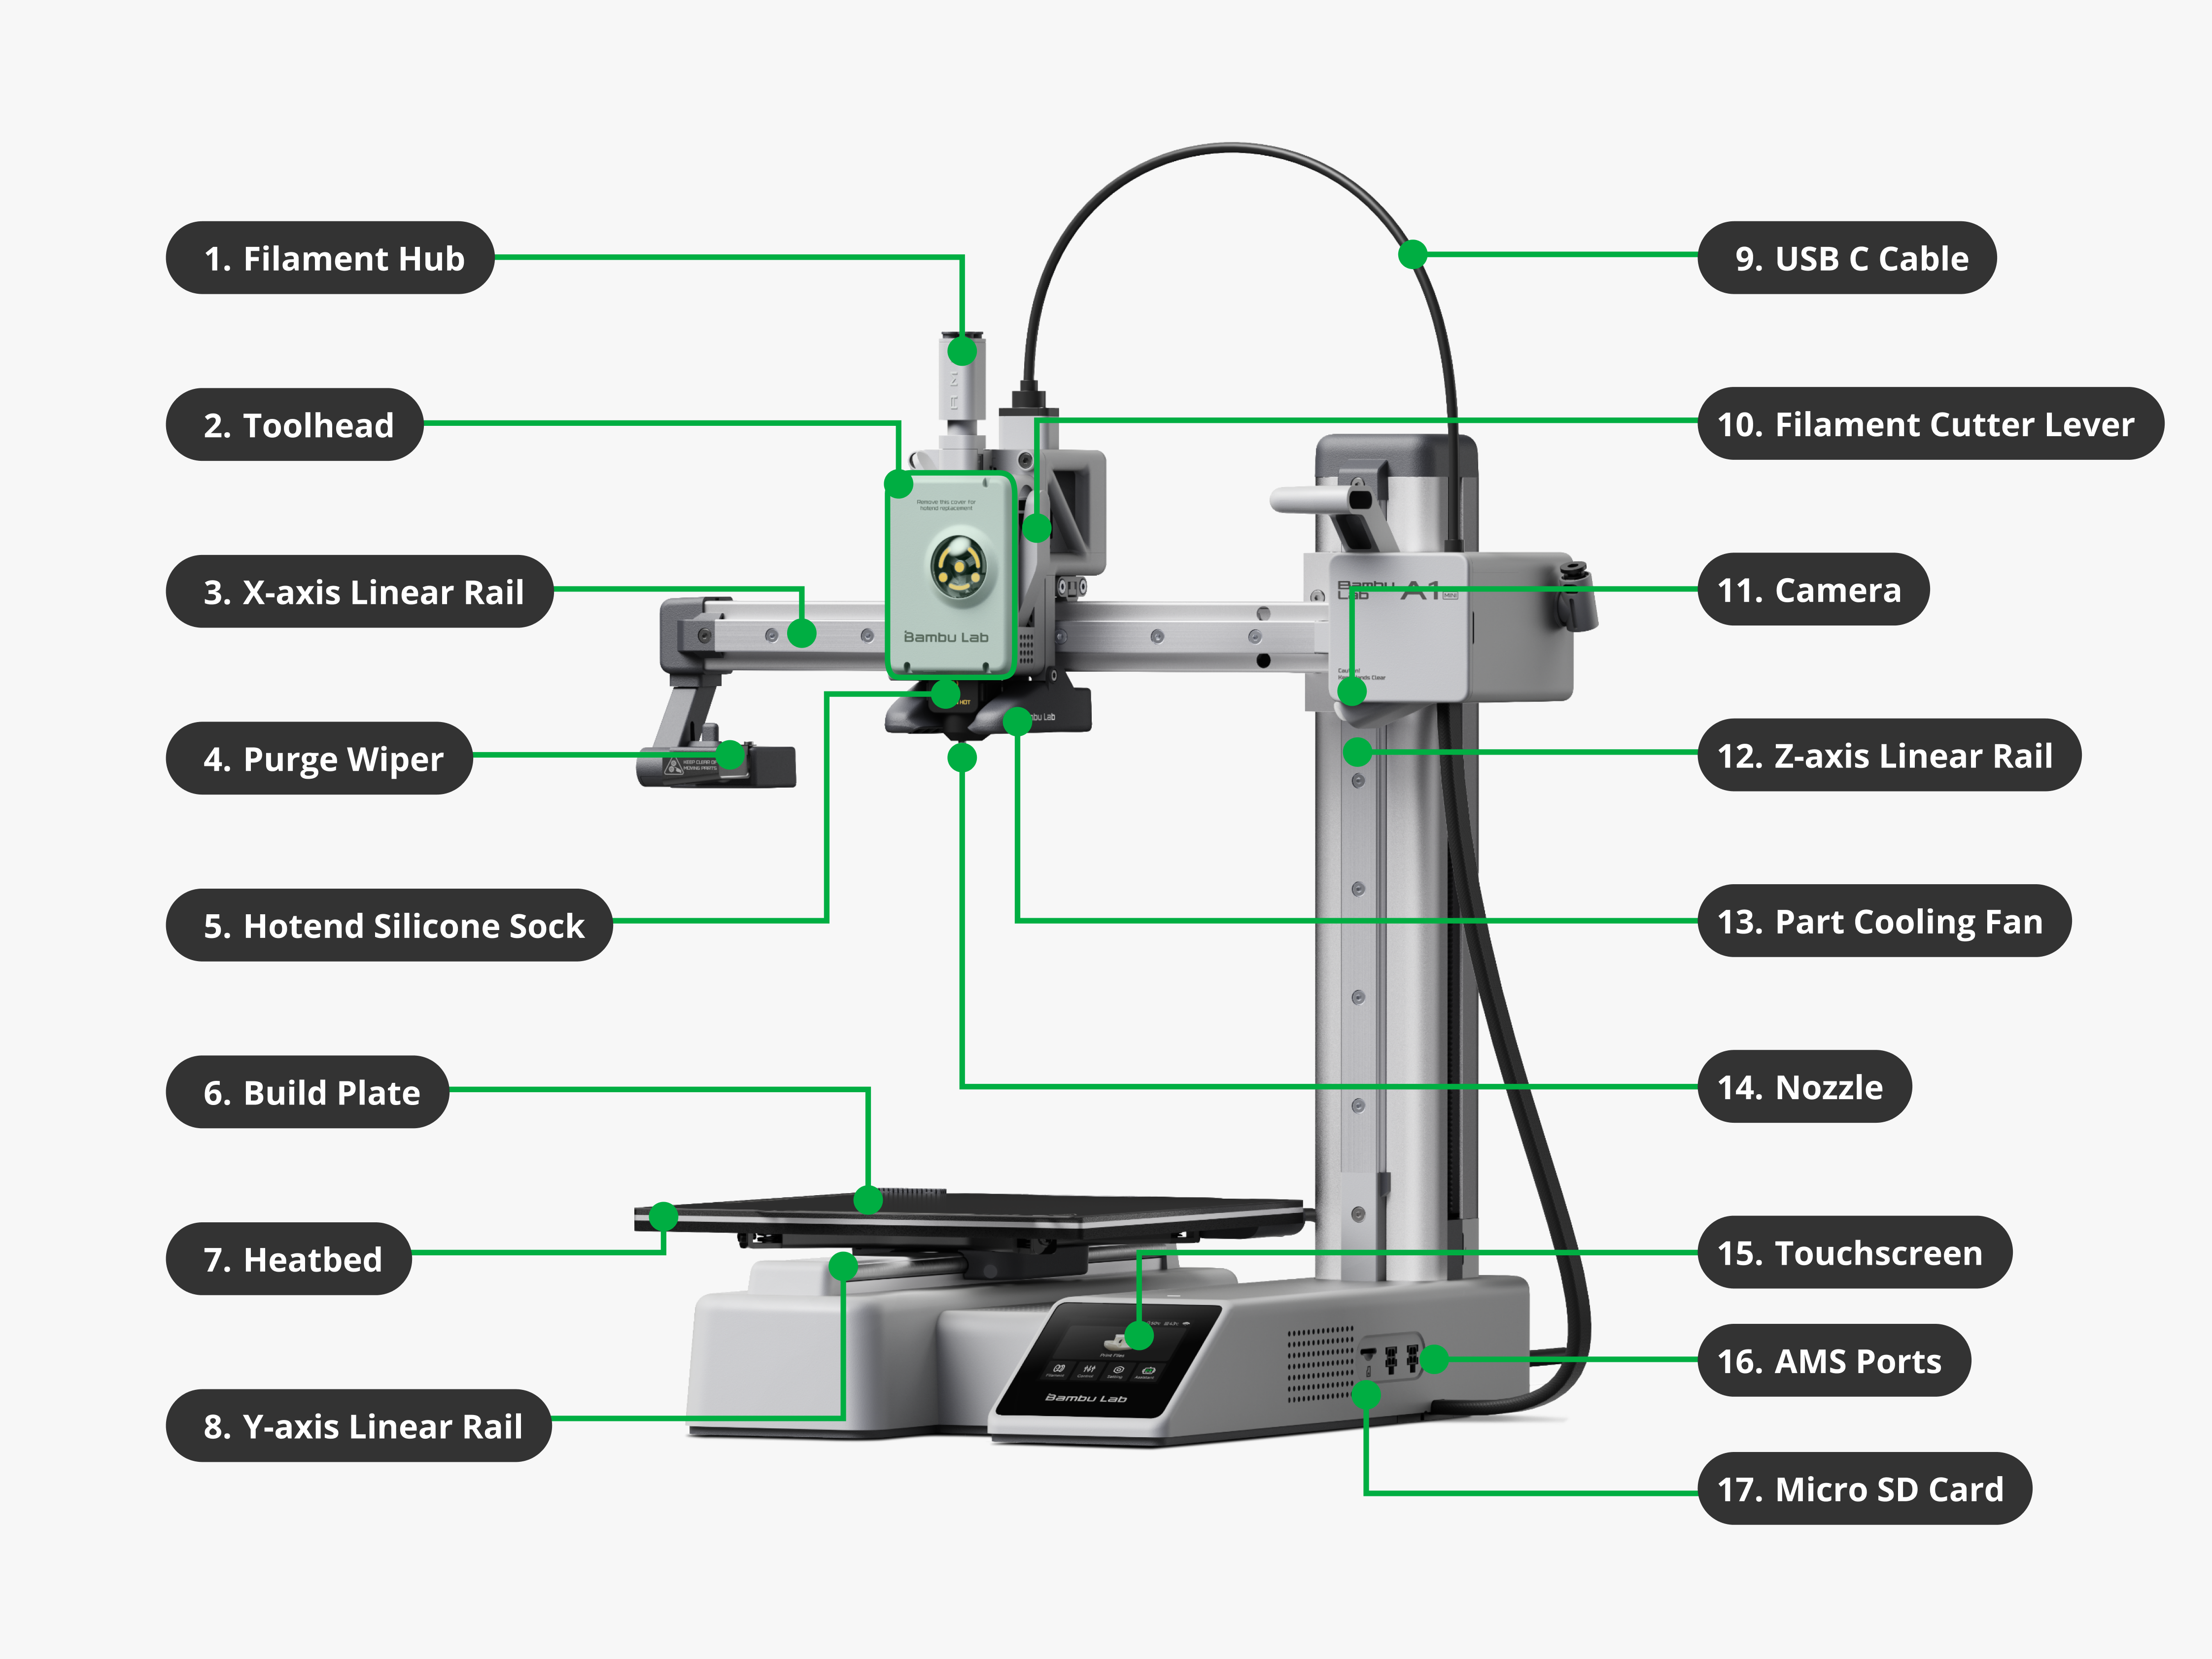
Key Components
This diagram shows all major parts of the Bambu Lab A1 mini 3D printerA machine that builds objects layer by layer from a digital 3D model. , including:
| # | Name | Description |
|---|---|---|
| 1. | Filament Hub | Holds and feeds the filament into the printer |
| 2. | Toolhead | Contains the ExtruderPushes and melts filament to create layers during 3D printing. and moves to lay down filament |
| 3. | X-axis Linear Rail | Provides smooth motion for the toolhead on the X-axis |
| 4. | Purge Wiper | Removes purged filamentExcess filament pushed out of the nozzle to clear old or mixed material. before and during printing |
| 5. | Hotend Silicone Sock | Keeps the nozzle insulated to maintain temperature |
| 6. | Build Plate | Magnetically attaches to the Heatbed; where the model is printed |
| 7. | Heatbed | Moves on the Y-axis and provides a heated surface for printing |
| 8. | Y-axis Linear Rail | Enables Y-axis movement for the Build Plate |
| 9. | USB-C Cable | Connects the Toolhead to the Mainboard |
| 10. | Filament Cutter Lever | Cuts filament for clean feeding |
| 11. | Camera | Records prints or assists in monitoring remotely |
| 12. | Z-axis Linear Rail | Moves the X-axis assembly vertically |
| 13. | Part Cooling Fan | Cools printed layers quickly for better quality |
| 14. | Nozzle | Melts and deposits filament to form the print |
| 15. | Touchscreen | Controls printer functions and displays status |
| 16. | AMS Ports | Connect to the AMSAutomatically loads and switches filaments for multicolor prints. |
| 17. | Micro SD Card | Used to load print files |
Load the Filament in the Extruder
What is it?
The extruder is responsible for pulling in, heating, and pushing the Filament through the nozzle. Before printing, you must properly load the filament into the extruder. More infos here.
Steps
- Cut the filament tip at a sharp angle (~45°). This makes it easier to insert.
- Insert the filament into the filament hub until you feel slight resistance.
- On the touchscreen, select Load Filament. The printer will:
- Heat the nozzle to the correct temperature (based on filament type)
- Pull the filament through the tube into the toolhead
- Extrude a small amount to confirm it's flowing correctly
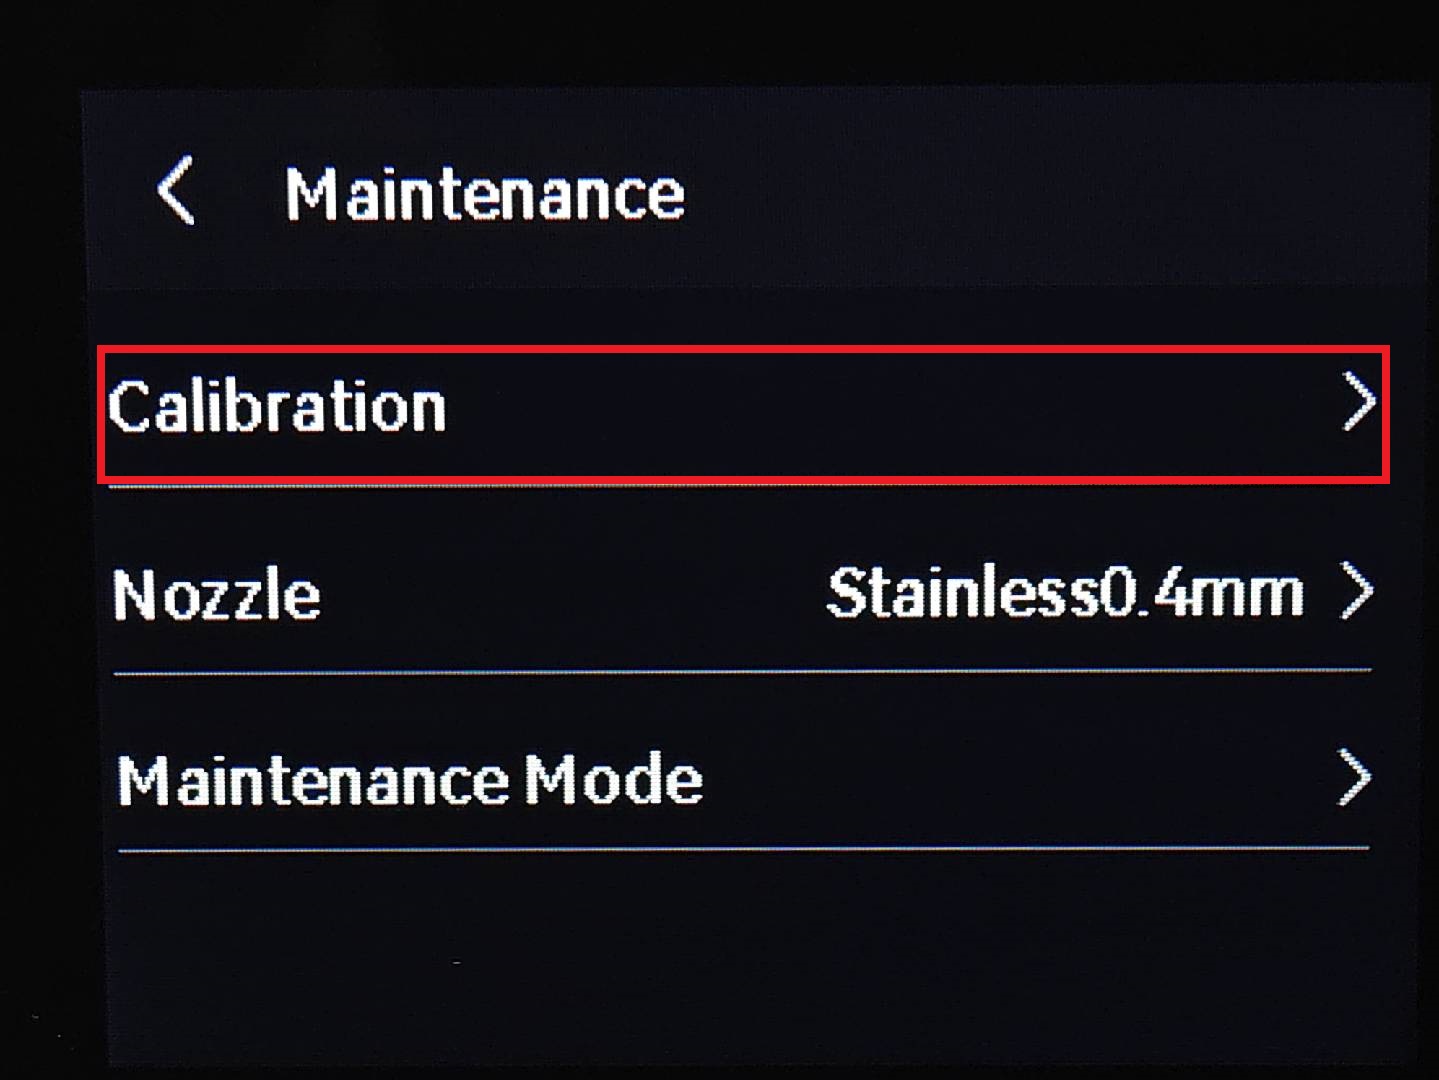
Calibration
What is it?
Calibration routines ensure that the printer is operating correctly. On modern printers (like the Bambu Lab A1 mini), important settings like bed leveling, nozzle height, vibration compensationReduces printer vibrations for smoother and more accurate prints., and motor noise tuning are handled automatically using internal sensors. More infos here.
Steps
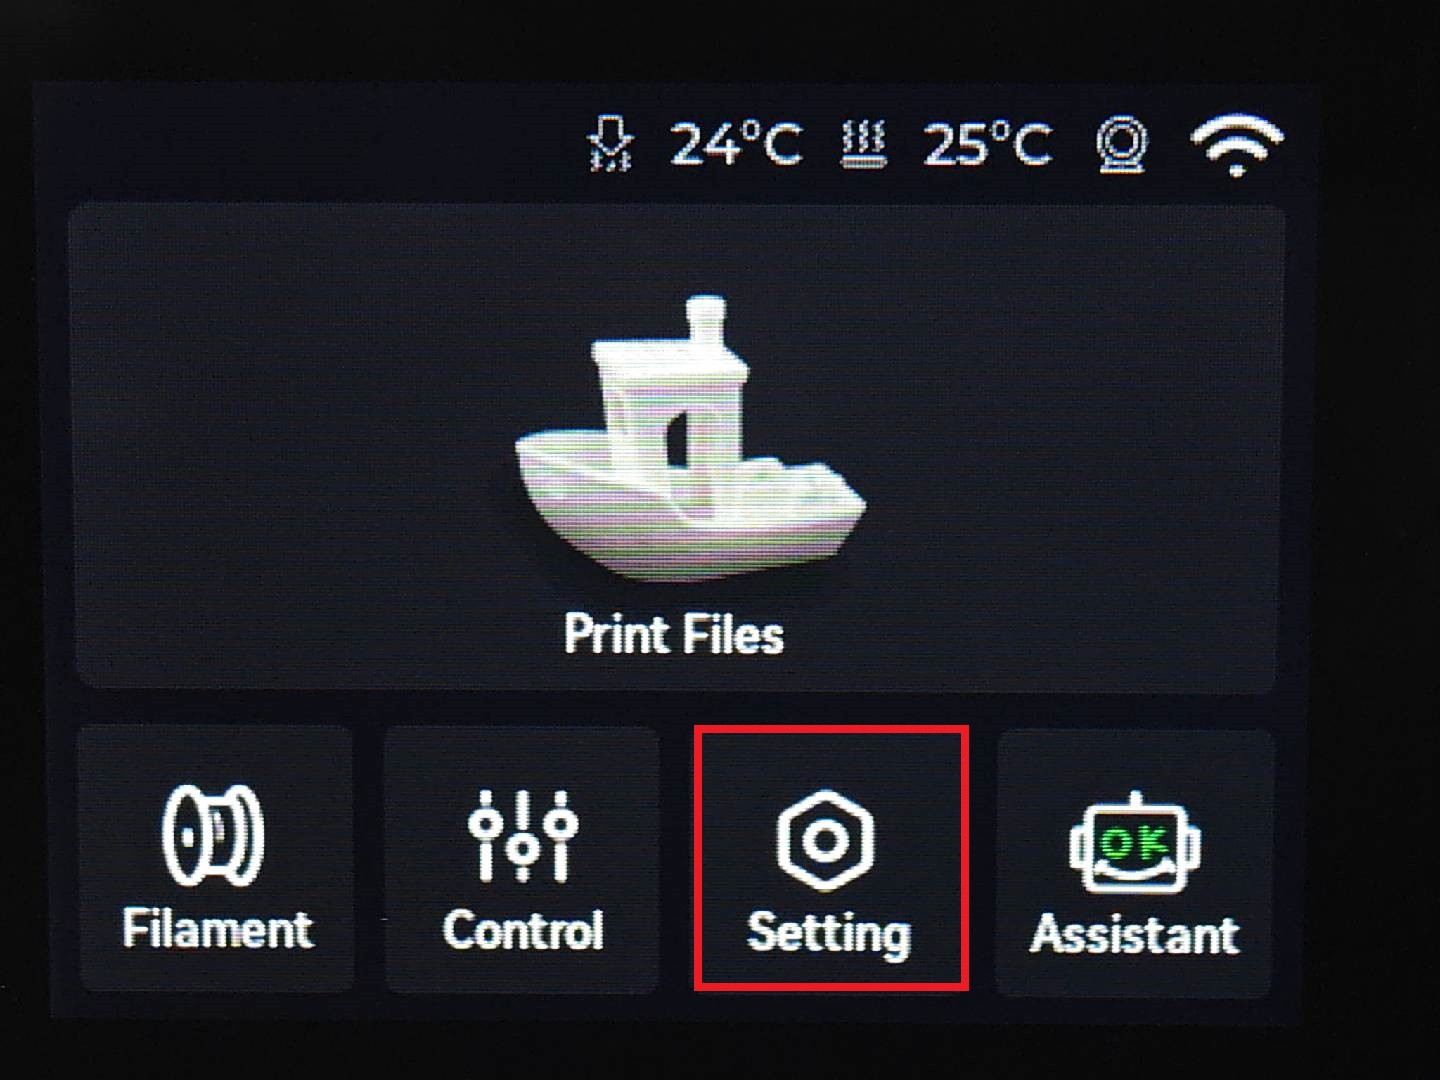
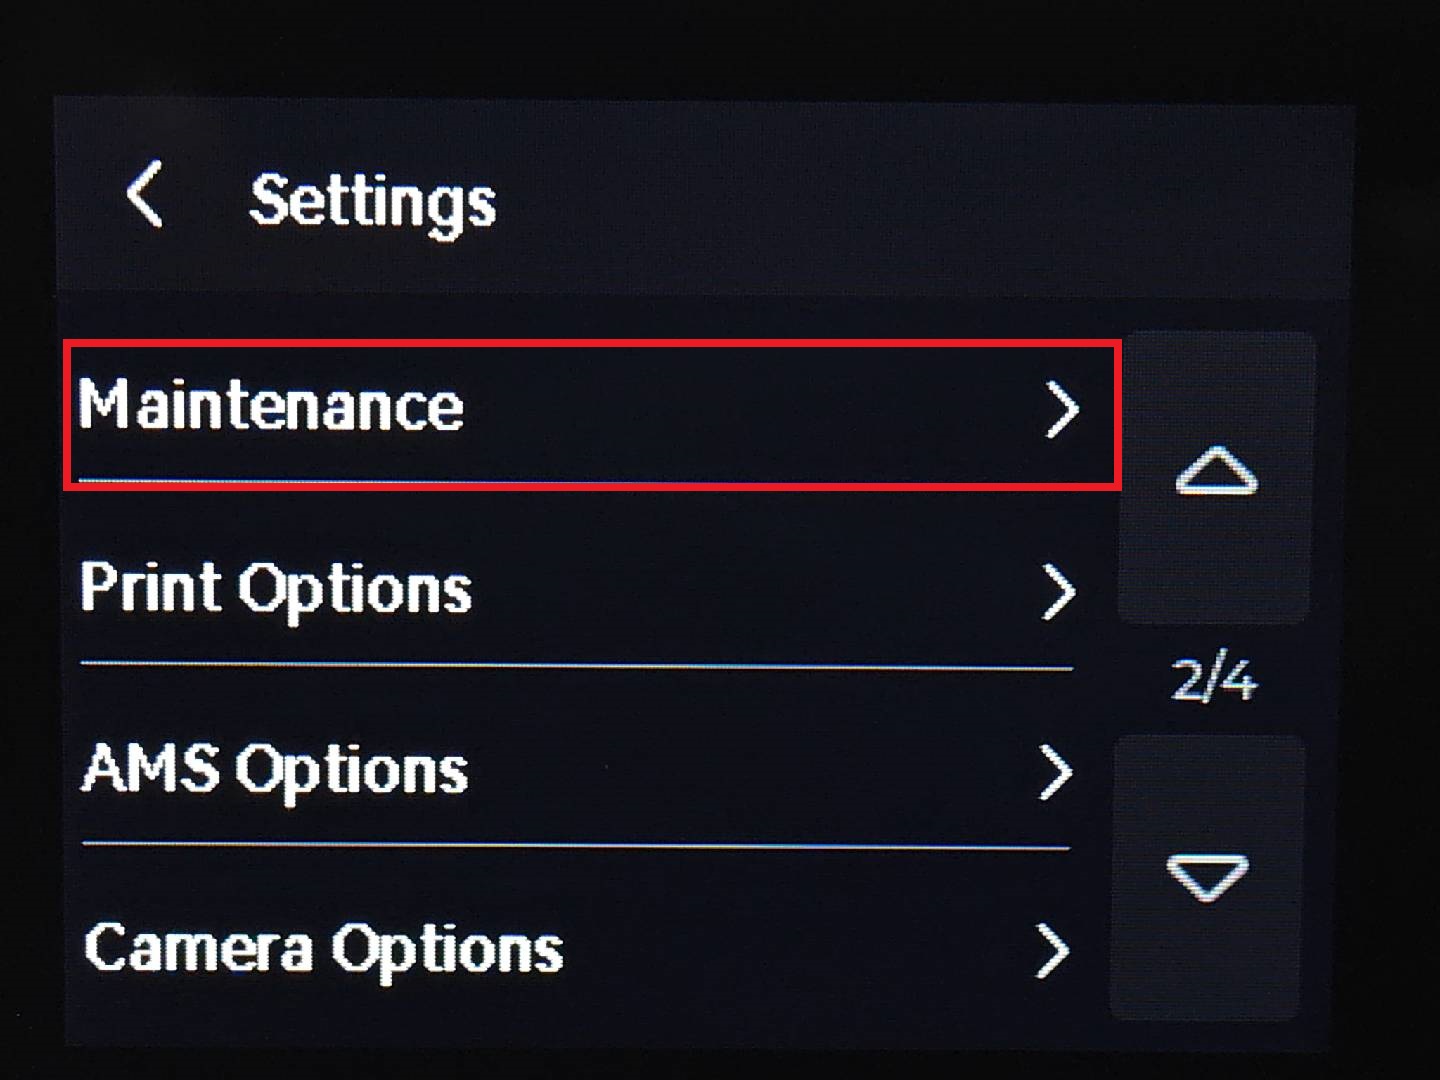
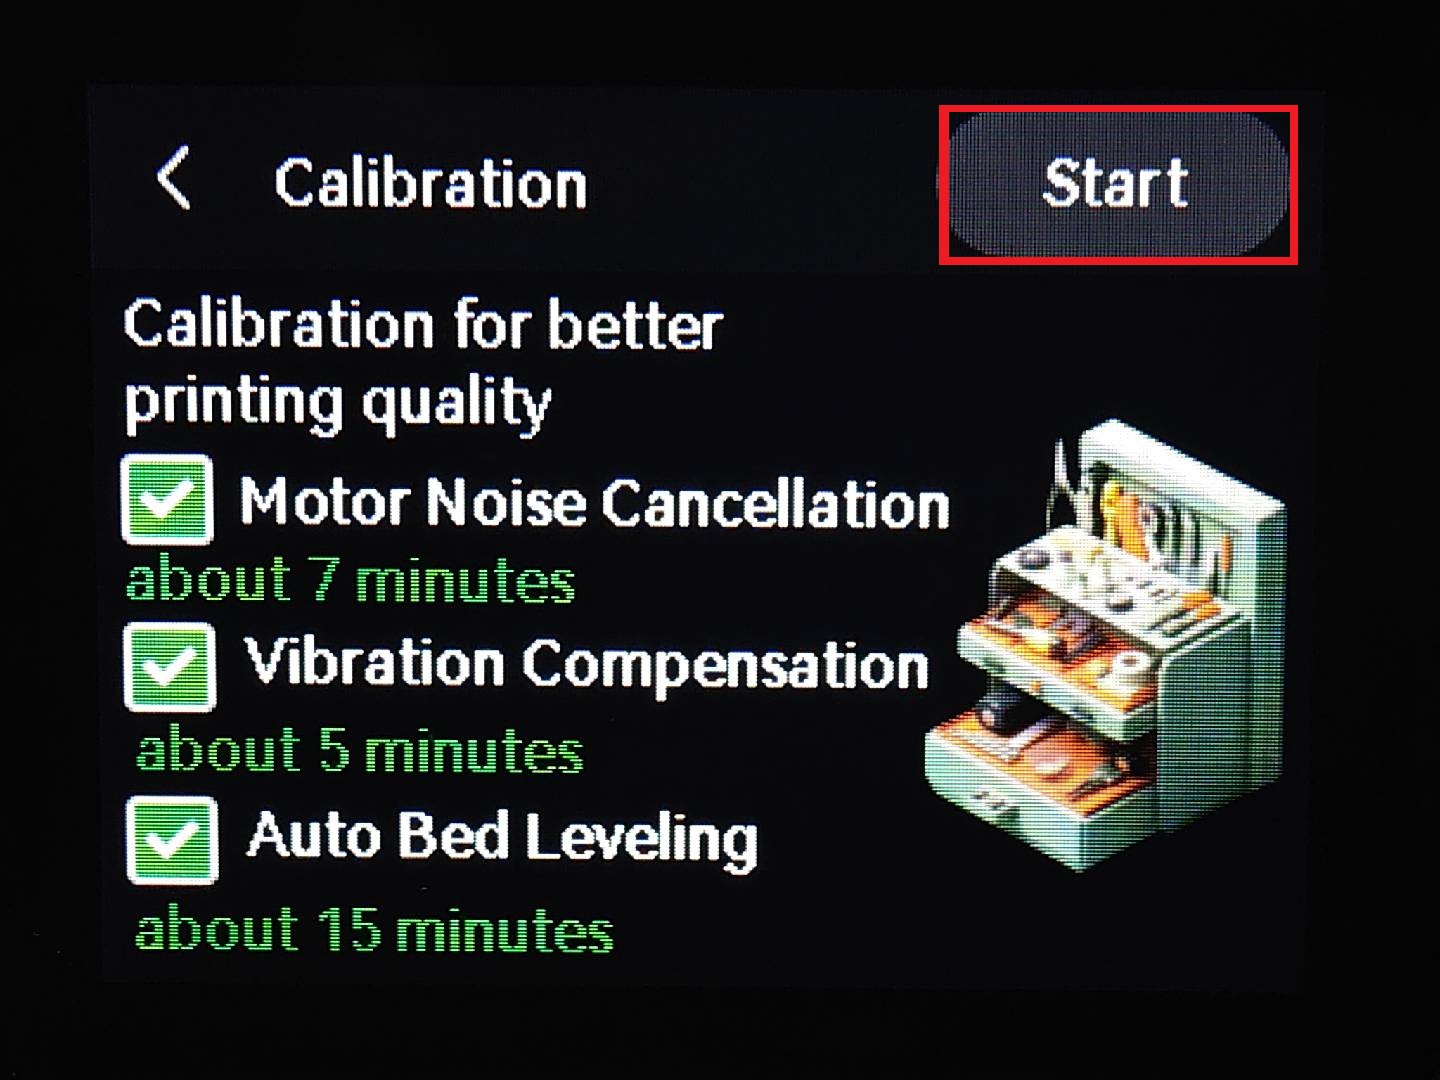
- On the touchscreen, go to Settings → Maintenance → Calibration → Start (for the Bambu Lab A1 mini).
- The printer will:
- Check bed level and compensate as needed
- Test nozzle flow by extruding a small line
- Perform a test print pattern to confirm proper adhesion and alignment
What to watch for during the test pattern:
- The first layer should be slightly squished onto the plate — not too high, not scraping
- The lines should be continuous and clean
- No skipping, gaps, or blobs
Bed Leveling
What is it?
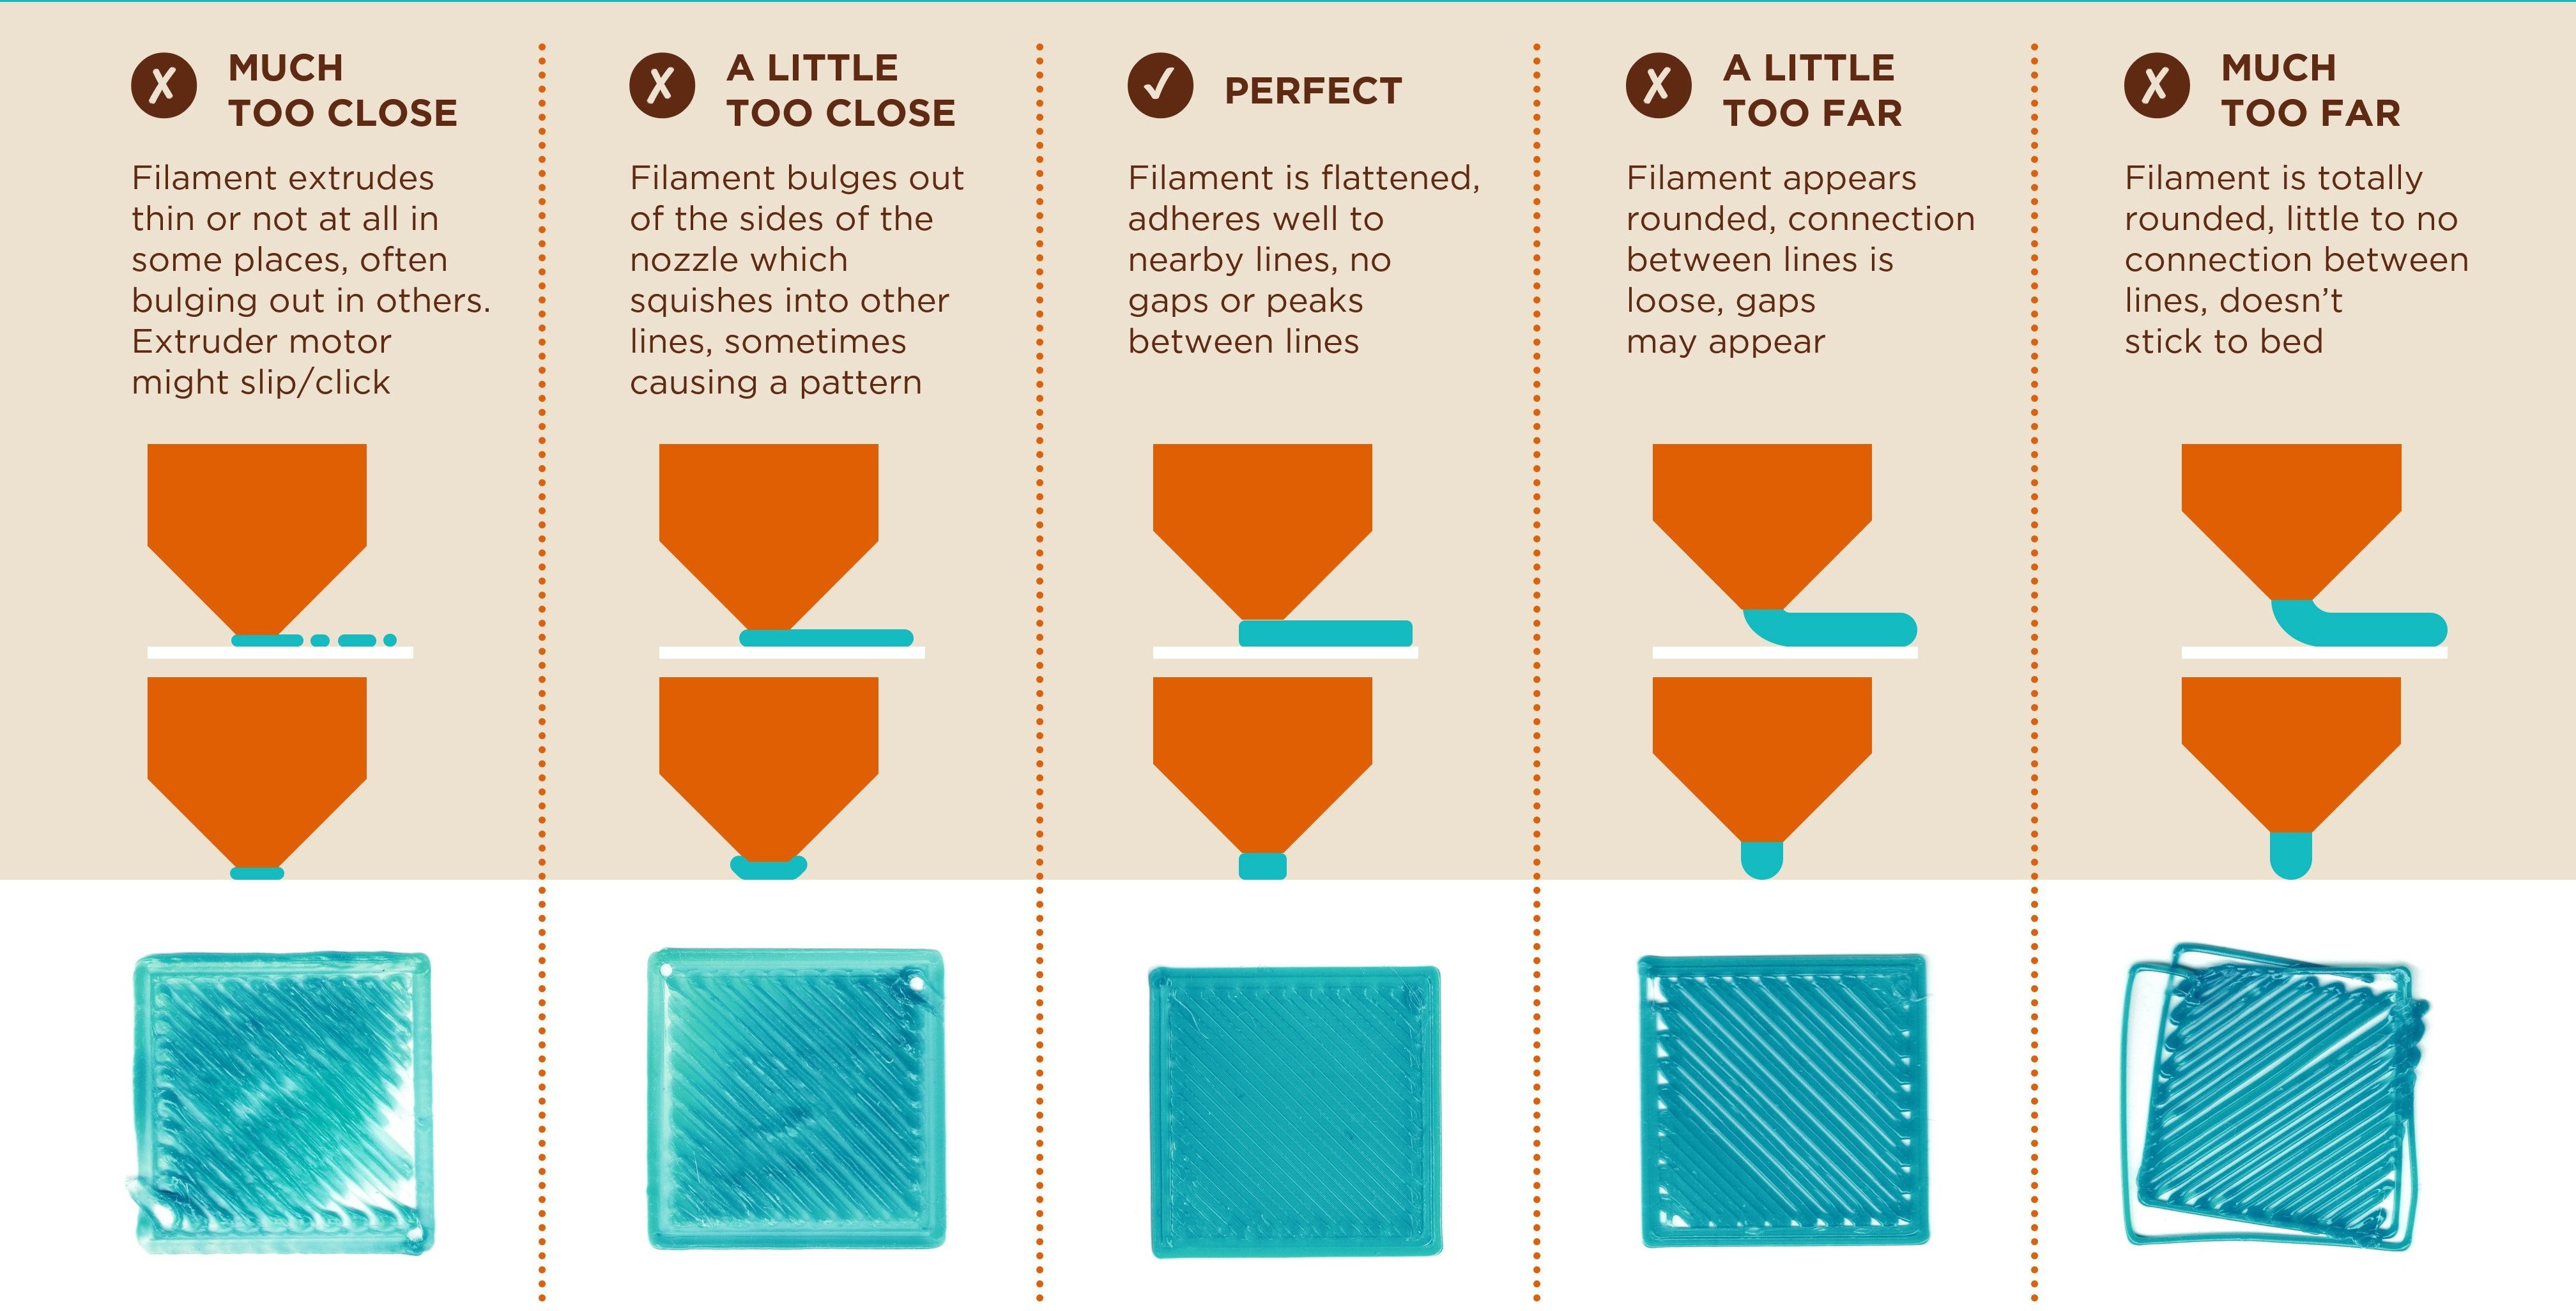
Bed leveling is the foundation of any succesful print, the process of ensuring that the build plate is perfectly parallel to the plane of the printer’s nozzle movement. If the nozzle is too close to the bed, filament can get squished or not extruded at all. If it’s too far, the first layer won’t stick, causing the print to fail early. It is one of the most important calibrations.
Automatic Leveling (Recommended – Built-in)
The Bambu Lab A1 mini uses auto bed leveling (ABL) with internal sensors that measure the distance between the nozzle and the bed at several points. The printer creates a “mesh map”A detailed height map of the print bed used for precise leveling. and adjusts the nozzle height dynamically. You do not need to manually turn any screws.
Manual Leveling (Advanced)
If needed, you can manually level using bed knobs and a piece of paper to match nozzle distance at each corner. Please go to Chapter 5: Manual Bed Leveling for more details.
Steps
- In the Calibration settings, as above, select Auto Bed Leveling
- The printer will probe the bed at multiple points
- It stores this data and compensates for any unevenness during printing
Maintenance Tips During Setup
- Clean the bed surface before the first print using isopropyl alcohol (IPA). Finger oils can prevent good adhesion.
- Keep the nozzle clean. If old filament is stuck, use a cold pull or the built-in cleaning cycle.
- Check the firmware: update via the touchscreen if a new version is available. It may include improvements to calibration or printing.
| Calibration | Test routine to optimize print accuracy | |
| Bed leveling | Ensuring the print surface is flat relative to the nozzle | |
| Extruder | Mechanism that feeds and melts the filament | |
| Nozzle | Tip that extrudes the melted filament | |
| Build Plate | Flat surface where prints are made |
Test the knowledge you have accumulated from this chapter by completing this interactive Quiz Test!
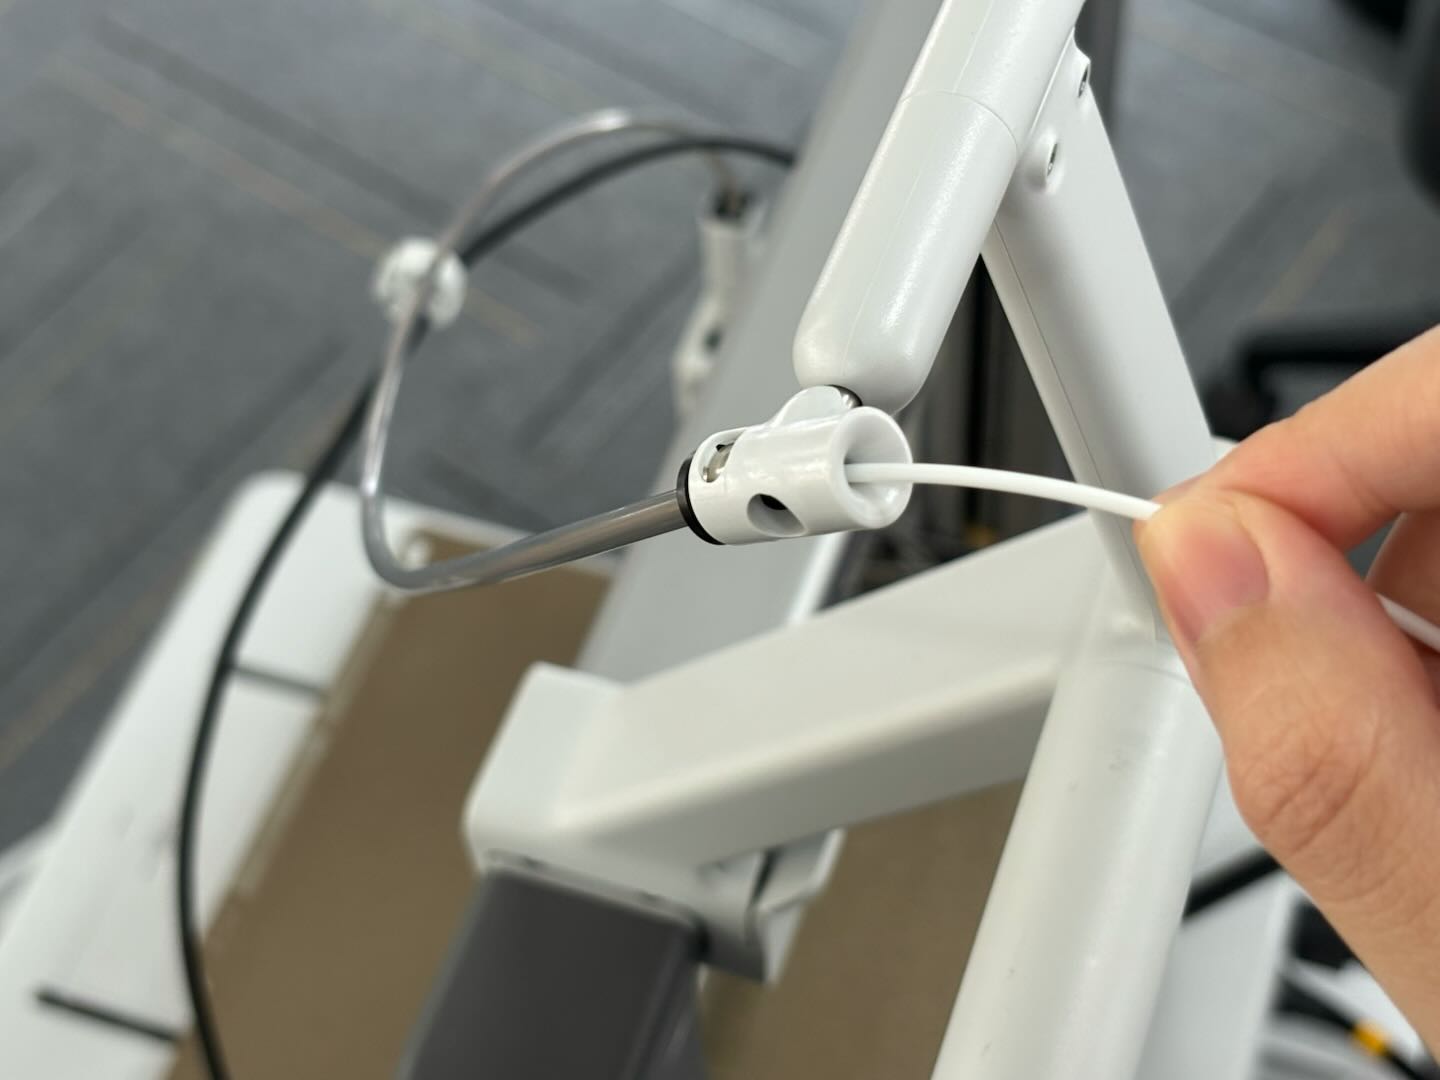
Manual Bed Leveling
What is it?
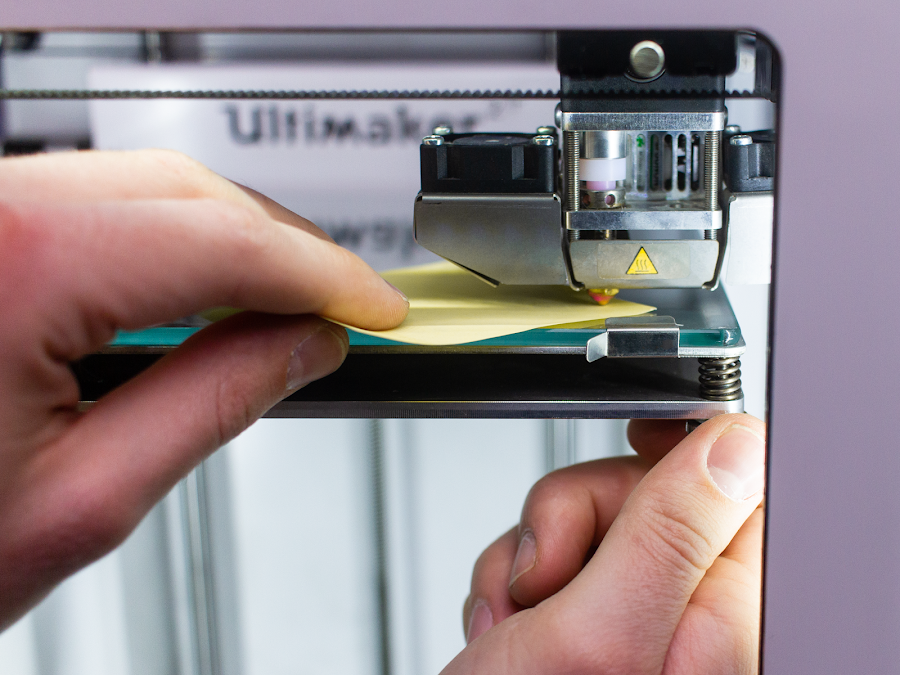
Manual leveling requires the user to adjust the bed using mechanical knobs or screws located underneath the build plate. The process usually involves moving the print head to various corners of the bed and inserting a leveling aid such as a sheet of paper to gauge the distance between the nozzle and the plate.
Steps
- Heat the nozzle and bed to printing temperature.
- Move the nozzle to each corner and center.
- Slide a sheet of paper between the nozzle and bed.
- Adjust the bed until there is slight resistance on the paper.
- Repeat the process until the nozzle is equidistant at all points.
Here is a tutorial for general printers in more detail and here to manual bed leveling guide specific for the Bambu A1 mini.
Comparison: Manual vs. Automatic Leveling
Whether you choose manual or automatic leveling depends on your needs, experience level, and printing
environment.
Choose Manual Leveling if: you have experience and want full control over the process, have a printer
without automatic bed leveling (ABL), print small models where perfect leveling is easier to achieve
manually.
Choose Autoamtic Leveling if: you are new to 3D printing, you switch between different materials frequently
and you want to save setup time before each print.
| Feature | Manual Leveling | Automatic Leveling |
|---|---|---|
| User Control | Full | Limited |
| Ease of Use | Challenging for beginners | Easy and beginner-friendly |
| Accuracy | Depends on skill | Consistently high |
| Setup Time | Slower | Faster after initial configuration |
| Best for | Experienced users | Beginners and advanced users alike |
Tips and Tricks
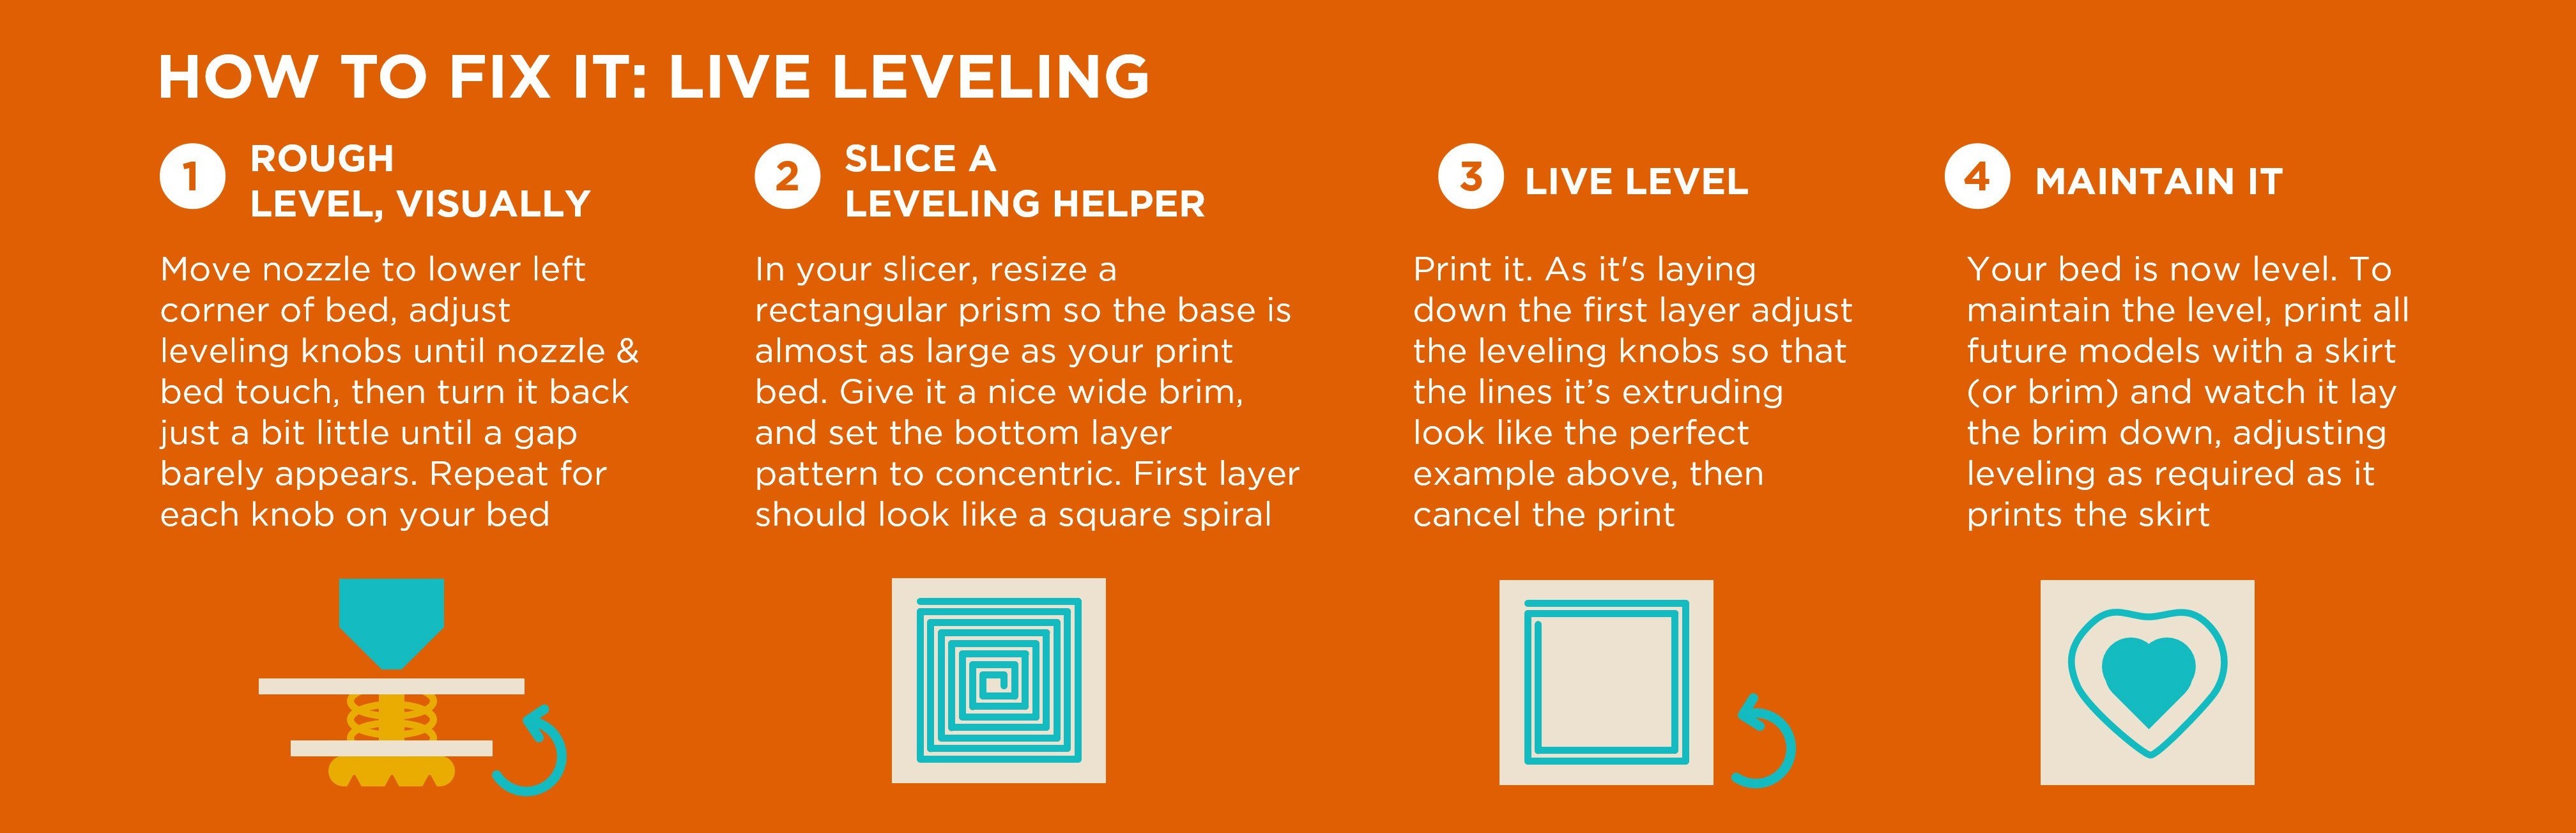
Incorrect Bed Leveling Examples & Live Leveling
Here is a graphic made by Billie Ruben, showing some examples of what happens when the bed is not leveled correctly and how to fix it with live levellingLive leveling is the process of adjusting the bed height while the printer is actively printing the first layer. :
Further Help
If the above steps do not work, here are some more tips:
- The bed surface may need to be cleaned, you may need to add some glue to the surface (especially if its cold)
- The temperature is not right, bed should usually around 60°C and nozzle 200°C for PLA
- If you have leveled the edges but the center part is too high or too low, your bed may be warpedWarped bed: A bed that isn't perfectly flat, causing uneven gaps between the nozzle and the build surface. and should be replaced.
- The speed may be too high, use the Slicer default settings.
Changing Filament Mid Print
What is it?
Changing Filament mid-print can be useful when you're switching to a different color, the filament runs out or you need a different material for part of the print.
Steps
- Pause the print: Use your printer's touchscreen or control panel to pause the print.
- Move the toolhead (optional): Some printers allow you to move the head away from the print to make space.
- Retract the filament: Use the menu to unload or manually retract the filament while the nozzle is still hot (above 180°C for PLA).
- Remove the old filament: After retracting, carefully remove the old filament. Handle this step delicately to avoid damaging the extruder or filament feeder.
- Insert new filament: Load the new filament until you see the new color/material come out of the nozzle or you feel some resistance.
- Purge: Before resuming the print, perform a 'purge' by extruding some of the new filament. This helps flush out any remaining old filament from the nozzle, ensuring a clean transition.
- Resume printing: Once the new filament is loaded, resume printing. Keep in mind that while the printer should continue from where it paused, there might be minor imperfections or color variations at the transition point.
Tips and Tricks
Tips for Changing Filaments During the Print
Changing filament mid-print is a 3D printing skill that needs careful attention to ensure a seamless transition. Here's how you can do it effectively:
- Check compatibility: Ensure the new filament is compatible with your printer and previous filament type. Adjust settings accordingly.
- Prepare in advance: Have the new filament ready before pausing the print to reduce downtime.
- Adjust temperature: Set the correct temperature based on the new filament's requirements (e.g., PLA: 190–220°C, ABS: 220–250°C).
- Clean the Extruder: Remove any residue from the previous filament to avoid mixing or clogs.
- Test extrusion: Perform a quick extrusionThe process of pushing melted filament out of the nozzle to form layers in 3D printing. to verify the filament is flowing properly before resuming the print.